SuperApp7 — Auto Color Match for Premiere Pro
Complete end-to-end user guide & reviewer walkthrough
Plugin version 1.3.0 · Adobe Premiere Pro 2020–2026 (14.0–26.x) · macOS & Windows
This document is a complete walkthrough of what the plugin does, who it is for, the value it delivers, and exactly how a user accesses, configures, and uses it from start to finish. Every screenshot below is the real panel UI and real frames rendered from a live Premiere Pro project.
🎬 Short demo video (32s, no narration):
the demo video— the end-to-end workflow as an explainer. The footage of people is shown small and their faces are blurred throughout, for the subjects’ privacy; the plugin’s interface and the measured numbers are the focus.
1. What it is, in one sentence
Auto Color Match makes the different camera angles of a multicam scene look the same — and look natural — by measuring each angle objectively and writing one color correction per angle, then lets you apply a single creative “look” to the whole finished cut.
It is a panel (a CEP extension) that lives inside Premiere Pro under Window → Extensions.
2. The problem it solves (the use case)
When you shoot one scene with several cameras — a cinema camera, a second body, and (very commonly) a phone — each camera renders color and exposure differently. Cut them together and the picture visibly jumps from shot to shot: one angle is neutral, the next is warm and over-saturated, the phone angle is warmer still and too bright. Matching them by hand in Lumetri is slow, subjective, and hard to keep consistent across a long edit.
Here is the exact problem, taken from the three real camera angles of one scene in the sample project
(Surimaday) — the same moment, three cameras:
| Cam 1 | neutral, balanced skin |
| Cam 2 | warmer, more saturated, deeper shadows |
| Cam 3 (a phone) | very warm, bright, heavily saturated |
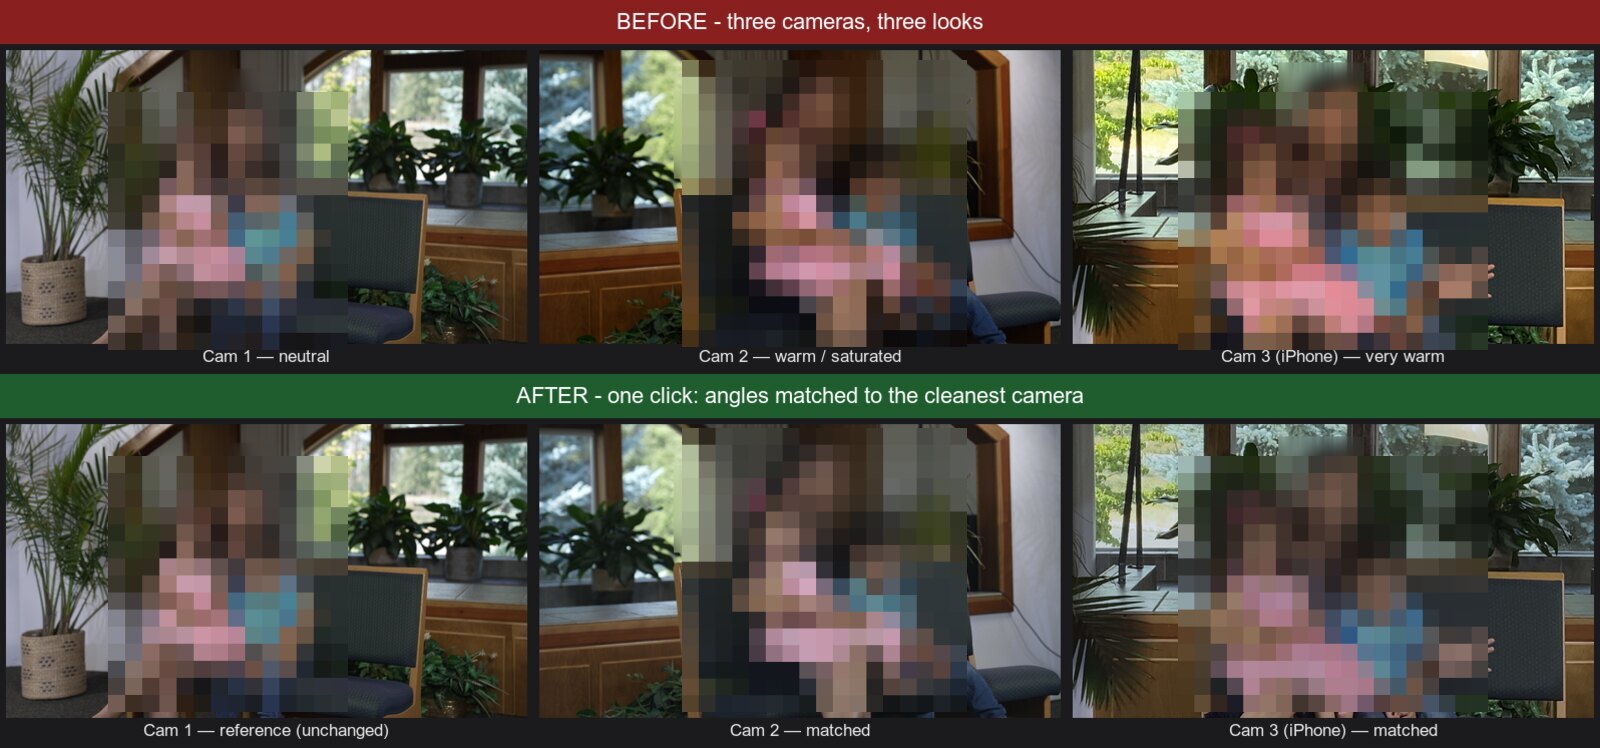
(Faces are blurred for the subjects’ privacy; the color difference between angles — and how the match removes it — is unaffected.)
The top row is the footage as shot — three cameras, three different looks. The bottom row is after one click in the panel: every angle has been matched to the cleanest camera, so the scene now cuts together. Skin tone, white balance, brightness and saturation are brought into agreement, while the natural warmth of the room is preserved (it is matched to a real camera, not forced to a sterile neutral).
Why this matters / the value: what is normally 10–20 minutes of careful, eyeball-driven Lumetri work per scene becomes a measured, repeatable, one-click operation — and because every decision is shown as a number with a plain-English direction (“too warm by 21 → lower Warmth”), it is usable by colorblind editors and produces the same result every time.
3. Prerequisites & system requirements
| Requirement | Detail |
|---|---|
| Application | Adobe Premiere Pro 2020 through 2026 (host version 14.0–26.x) |
| Operating system | macOS or Windows (identical behavior on both) |
| Project type | A multicam scene where each camera angle exists as a clip/sequence (the panel lists the angles for you) |
| Footage | At least one frame per angle where a face is visible (the panel measures skin tone — see §7) |
| External tools | None. No ffmpeg, no Python, no internet connection, no account. Everything runs inside Premiere’s built-in runtime. |
There is nothing to install beyond the plugin itself, and no data ever leaves your machine — the panel measures frames locally and writes corrections directly into your open project.
4. Installing & accessing the plugin
- Install the plugin. Double-click the signed
.zxpand install it with any standard CEP/ZXP installer (e.g. the Adobe UPIA / Creative Cloud add-on flow, or a ZXP installer utility). This places the panel in Premiere’s extensions folder. - Launch / restart Premiere Pro.
- Open the panel:
Window → Extensions → SuperApp7 - Auto Color Match.
The panel opens as a normal dockable Premiere panel. You can dock it next to Lumetri or float it.
First run — the welcome card
The first time the panel opens it shows a short welcome card summarizing the three-step workflow and the free 30-day Pro trial:
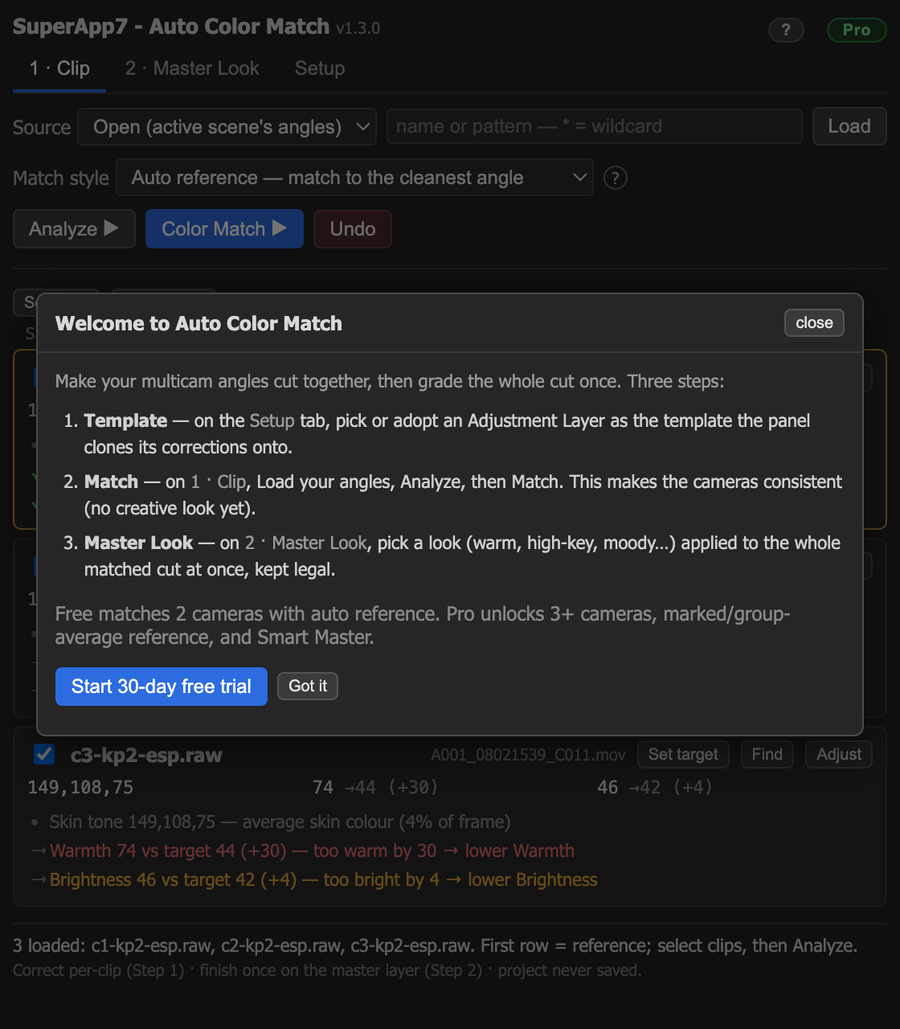
You can dismiss it with Got it and re-open it any time from the ? button in the header.
5. The panel at a glance
The panel has three tabs:
| Tab | Purpose |
|---|---|
| 1 · Clip | Match the camera angles of a scene so they cut together (no creative look here). |
| 2 · Master Look | Apply one creative look (warm, high-key, moody…) to the whole finished cut. |
| Setup | One-time configuration: which adjustment layer to use as a template, naming, legal-limiter target, log location. |
The header also shows the version and a Free / Pro license chip (click it to see plans or enter a license — see §10). The workflow is deliberately split: match per clip on Step 1, grade once on Step 2. The footer always reminds you the project is never saved by the panel — you stay in control and can undo at any time.
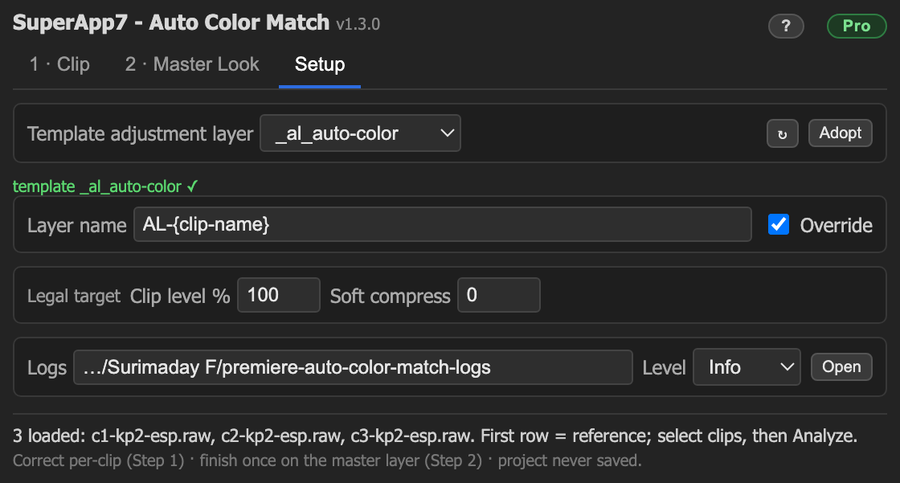
6. Setup (one time)
Open the Setup tab once before your first match.
| Control | What it does |
|---|---|
| Template adjustment layer | The panel writes each correction onto a copy of an Adjustment Layer. Pick an existing one, or click Adopt to turn a standard Premiere Adjustment Layer into the template (_al_auto-color). The green tick confirms a template is set. |
| Layer name | Naming pattern for the per-clip layers it creates. Variables: {clip-name}, {seq-name}, {scene}, {cam}. |
| Override | On: reuse/replace the layer the panel made before (clean re-runs). Off: stack a new layer on top. |
| Legal target | Broadcast-legal limiting target used by Step 2 (Clip level %, soft compression). |
| Logs | Where run logs are written (defaults to a folder next to your project) and the detail level. |
That’s the entire configuration. After this you rarely touch the Setup tab again.
7. Step 1 — match the camera angles (the core workflow)
This is the heart of the plugin. Open the 1 · Clip tab.
7a. Load the angles
- Source chooses where the angles come from: Open (the angles of the active scene — the
panel auto-detects the camera naming pattern, e.g.
c1-…,c2-…,c3-…), Selected (whatever you selected in the Project panel), or Filter (a name/wildcard). - Click Load. Each camera angle appears as a row.
7b. Choose the match style
The Match style dropdown decides what every angle is matched to:
| Mode | Behavior |
|---|---|
| Auto reference (default) | The panel measures all angles and matches the others to the cleanest one automatically. |
| Marked reference | You pick the hero angle with the Set target button on a row; the rest match it. |
| Group average | All angles are matched to the group’s average. |
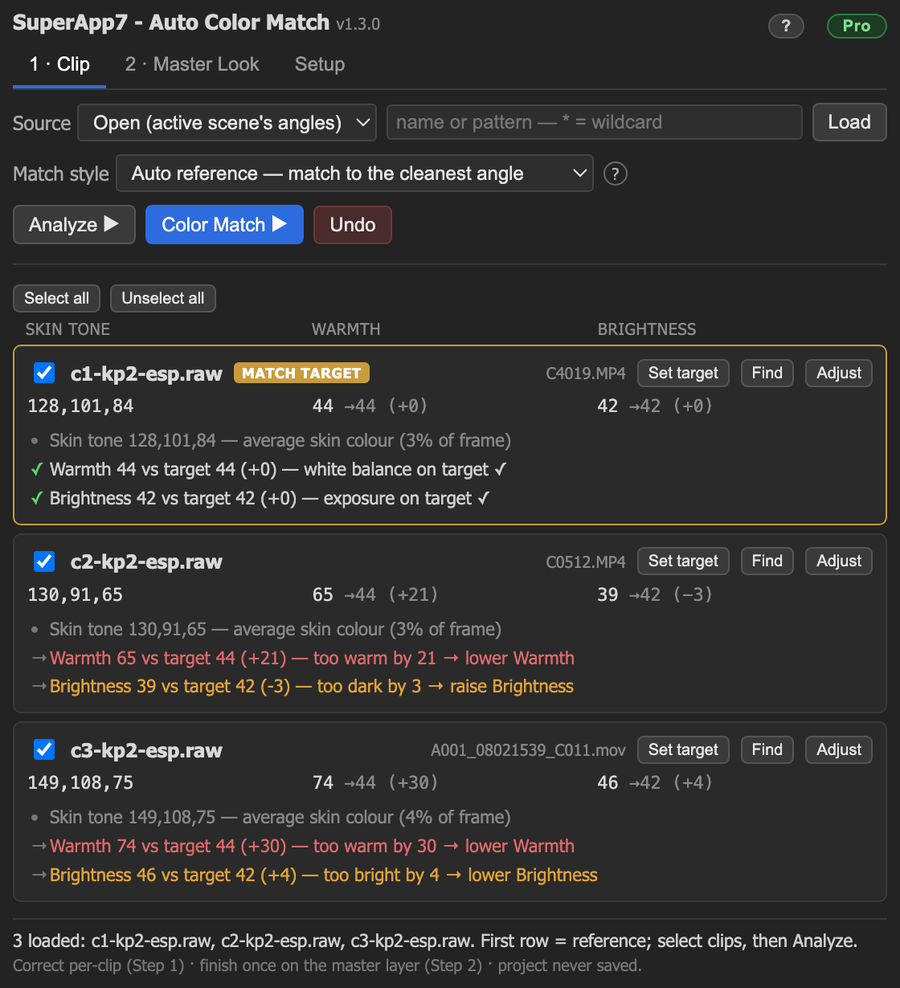
7c. Analyze — see the numbers
Click Analyze ▶. The panel exports one frame per angle, measures it, and fills three columns per row:
- Skin tone — the average skin color it detected (R,G,B).
- Warmth — Red minus Blue on skin. Higher = warmer. Shown as
measured → target (difference). - Brightness — skin brightness on the 0–100 (IRE) video scale, again
measured → target (diff).
Below each row it prints a plain-English verdict, color-coded (green ✓ = on target, amber/red = off):
c1-kp2-esp.raw   MATCH TARGET
  Skin tone 128,101,84 — average skin colour (3% of frame)
  ✓ Warmth 44 vs target 44 (+0) — white balance on target
  ✓ Brightness 42 vs target 42 (+0) — exposure on target

c2-kp2-esp.raw
  → Warmth 65 vs target 44 (+21) — too warm by 21 → lower Warmth
  → Brightness 39 vs target 42 (-3) — too dark by 3 → raise Brightness

c3-kp2-esp.raw   (a phone)
  → Warmth 74 vs target 44 (+30) — too warm by 30 → lower Warmth
  → Brightness 46 vs target 42 (+4) — too bright by 4 → lower Brightness
The angle marked MATCH TARGET (gold) is the reference the others will be matched to. In the example, Auto reference picked Cam 1 because it is the most neutral.
This is the colorblind-friendly part: you never have to judge a color by eye. The panel tells you the number, the target, the difference, and which direction to move.
7d. Color Match — one click
Click Color Match ▶. For every selected non-reference angle the panel:
- Measures the angle and the reference,
- Computes a single ASC CDL correction (an industry-standard color-decision-list — slope / offset / power per channel, plus saturation) that brings the angle’s skin tone, white balance, brightness and saturation onto the reference, without over-bending the image into an unnatural cyan or magenta, and
- Writes that one correction onto a per-clip adjustment layer.
The result is the after row from §2 — the warm Cam 2 and the very-warm phone angle now match the neutral Cam 1. A summary dialog reports each angle’s before/after numbers, and a toast points you to Step 2 for the creative look.
If you don’t like a result, Undo restores the angles to exactly how they were before the match. The panel does not save your project.
8. Step 2 — the creative look (Master Look)
Step 1 only matches the cameras; it intentionally applies no creative look. The creative grade goes here, on 2 · Master Look, applied once to the entire finished cut.
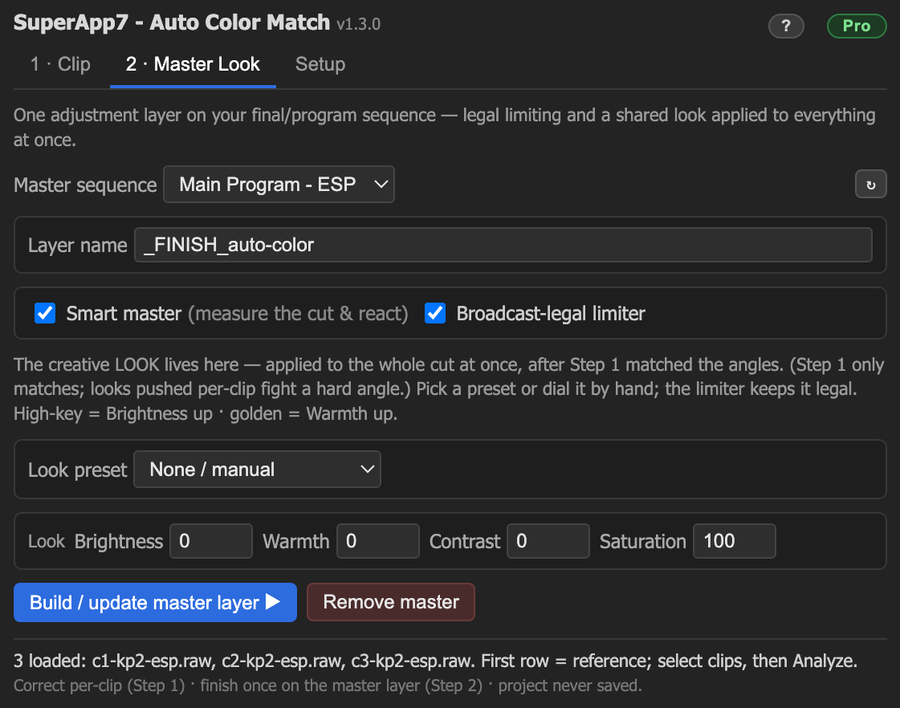
| Control | What it does |
|---|---|
| Master sequence | Your final/program sequence (the assembled cut). |
| Layer name | The single adjustment layer placed over the whole program (_FINISH_auto-color). |
| Look preset | A starting look — High-key (bright/airy), Warm (golden), Cool (clean), Low-key (moody) — or None / manual. |
| Brightness / Warmth / Contrast / Saturation | Dial the look by hand; presets just pre-fill these. |
| Smart master | Measures the whole matched cut and reacts to it — auto-balances any residual color cast and turns “High-key” into a measured, still-legal headroom fill. (Pro feature.) |
| Broadcast-legal limiter | Adds Premiere’s Video Limiter so the result stays broadcast-legal (target set in Setup). |
Click Build / update master layer ▶ to apply it; Remove master takes it off.
Why the split? A creative look pushed onto each clip individually fights a hard angle — a dark, over-saturated phone shot can’t be force-graded cleanly and goes muddy. Matching first, then grading the matched cut once, lifts every angle together and looks far better. This two-step design is the core of the plugin’s approach.
9. Safety & non-destructive behavior
- The panel never saves your project. It writes effects/adjustment layers you can review and Undo; you decide whether to save in Premiere.
- All corrections are standard Premiere effects (ASC CDL, Lumetri, Video Limiter) on adjustment layers — fully editable and removable by hand afterward.
- Everything is local. No internet, no account, no telemetry, no footage ever leaves the machine (see our privacy policy).
10. Free vs Pro
The plugin works for free for the most common case (a 2-camera match with auto reference, plus the Master Look presets and legal limiter). Pro unlocks larger and pro-grade workflows. Clicking the license chip opens the plans / license dialog:
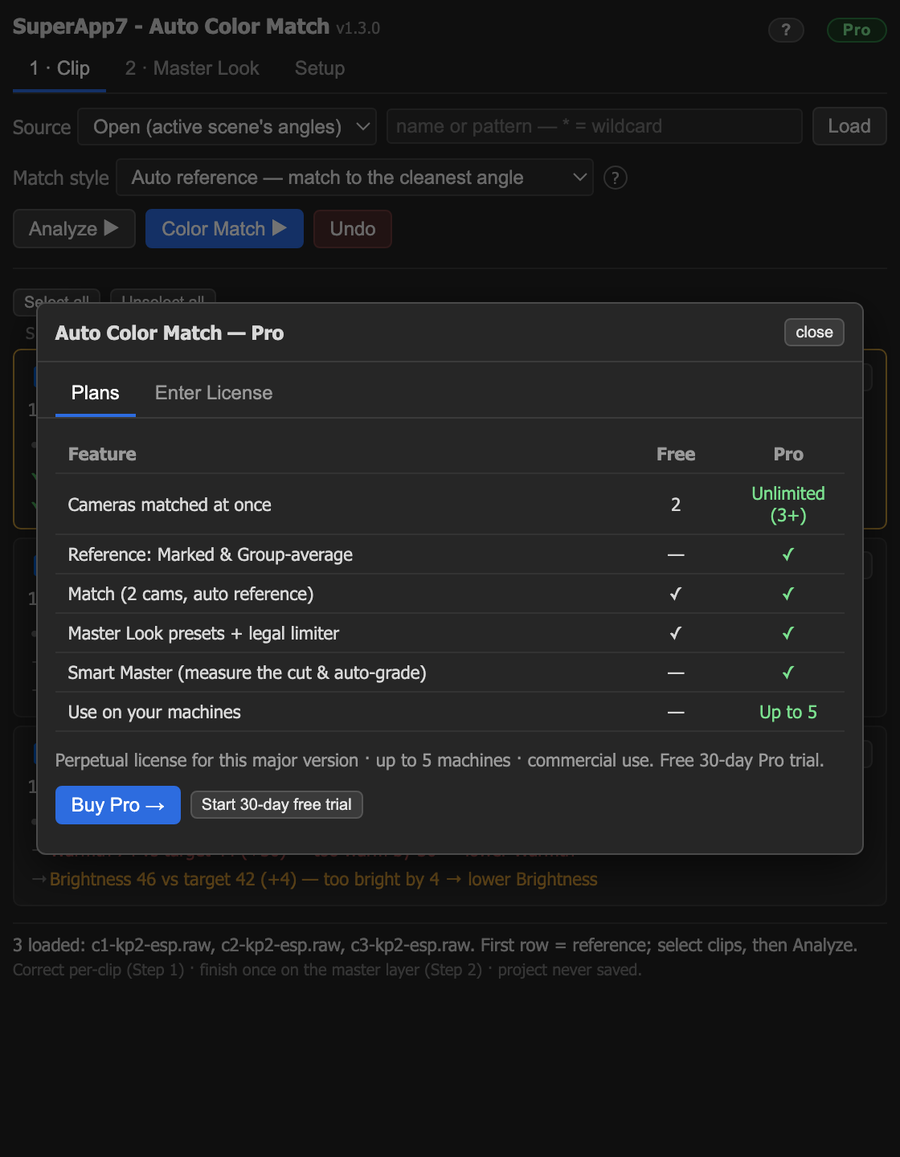
| Feature | Free | Pro |
|---|---|---|
| Cameras matched at once | 2 | Unlimited (3+) |
| Reference: Marked & Group-average | — | ✓ |
| Match (2 cams, auto reference) | ✓ | ✓ |
| Master Look presets + legal limiter | ✓ | ✓ |
| Smart Master (measure the cut & auto-grade) | — | ✓ |
| Use on your machines | — | Up to 5 |
A 30-day free Pro trial is available from the welcome card or the plans dialog. Licensing is a perpetual, offline, signed key (per major version, up to 5 machines, commercial use) — there is no account and no server call. See licensing.
11. End-to-end summary (the whole workflow in five lines)
- Setup (once) → adopt a template adjustment layer.
- 1 · Clip → Load your camera angles.
- Analyze ▶ → read the numbers (skin tone / warmth / brightness vs target).
- Color Match ▶ → every angle is matched to the cleanest camera. (Undo if needed.)
- 2 · Master Look → pick a look for the whole cut, kept broadcast-legal.
The angles now cut together and the cut carries one consistent grade — measured, repeatable, and colorblind-friendly, with the project left unsaved for your review.
Reproducing these screenshots
Every image in this guide was produced from the real plugin and a live Premiere Pro project: the
footage frames are exported from the three camera angles of one scene in the Surimaday sample
project (before, and after applying the engine’s computed ASC CDL match in Premiere), and the UI
screenshots are the panel’s own index.html + style.css rendered with the real measured values
shown above.